One of the classic mistakes in risk management is to treat it as a mechanical process that’s carried out in isolation by the project manager. Risk management works best when all team members collaborate and share their knowledge and insight. When risks are identified, analysed, mitigated and planned in collaboration, not only are more risks identified, accountability and ownership are also reinforced. Project managers sometimes assign themselves to most of the items in the risk register. But that doesn’t leverage the team or create a shared sense of responsibility. It’s important to assign the right owners and to gain their buy-in and acceptance for fully managing a risk.
Let’s examine the steps involved in managing risks in a collaborative manner. The method is based on post-it notes and flipchart paper and the team being co-located. If the team is working remotely, you can follow the same process by using an online collaboration tool.
Step 1: Silently brainstorm risks
The first step in collaborative risk management is to ask the team to silently brainstorm all possible project risks in a workshop setting. Give people a stack of post-it notes and ask them to consider anything that could go wrong. As they think of potential pitfalls they should write down each risk on a separate post-it note and stick them on the wall. The more specific the risks, the easier it will be to identify an appropriate response to them.
Some of the risks will be specific to the project, while others will be generic risks that affect all projects—for example, user unavailability at the time of user testing. That’s ok. Let team members capture all types of items as they could all turn into issues if not properly mitigated. And don’t make the mistake of deliberately omitting certain risks because they are too precarious to discuss. Remember, that it is much easier to manage a risk than to wait until it becomes an issue.
The second step is to consolidate and analyse the items. Call out each risk, one by one, and discuss the root cause of each risk by asking why, why, why? Keep digging until the team finds the ultimate source of the risk. This process will make it much easier to determine how to best respond to each risk. If you come across a risk that has already been mentioned, you can remove the duplicate.
Step 3: Place risks on impact and likelihood matrix
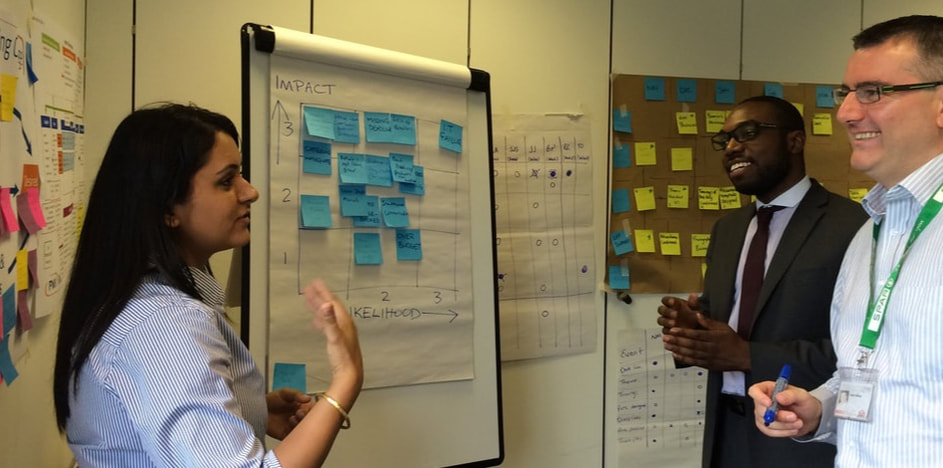
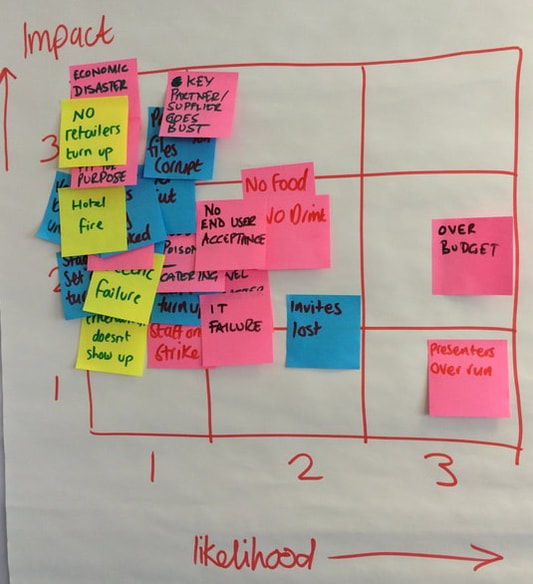
Once the team understands the root cause of each risk, the next step is to determine the likelihood of the risk happening as well as the level of impactin case it does happen. In other words, what will happen if this risk materializes? How will it affect time, cost, quality, business benefits and resourcing of the project? The best way to illustrate the impact and probability of a risk is to draw a risk matrix on a whiteboard or flipchart with likelihood along the horizontal axis and impact along the vertical axis. You can either use a numeric scale of 1 to 5, or a rating of high, medium, low. The team can then look at each of the identified risks and collaboratively place the post-it on the matrix according to how likely it is to happen and how big the impact would be in case it materializes.
The fourth step is to focus on the risks with the highest likelihood and highest impact and determine what the best risk response would be. What actions must be taken to lower the likelihood and lessen the impact of the most important risks? You probably don’t need to respond to every single risk that has been identified. I recently facilitated a risk workshop with a manufacturing team in Malaysia. They identified 24 risks across the project and decided to mitigate each and every risk. The project was simply too important to the business to take any risk.
In your case, decide which risks are worth mitigating and which are not. Some risks are too insignificant to do something about and others are not worth mitigating, for instance, if the risk action is more expensive than taking the risk. When you have determined the risk response, log it in your risk register by determining some tangible actions. I have worked with project managers who only captured risk responses such as avoid, transfer, mitigate, accept or escalate. That is not enough. The risk response needs to contain specific actions.
Step 5: Assign owner
Next, you need to assign an owner to each risk. The owner should be the person who is best suited to implement the risk response and monitor its progress. It could be anyone from within the team or steering committee as long as they accept responsibility. Many project managers make the mistake of assigning themselves to too many risks. As the project manager you are responsible for facilitating the risk management process, but that doesn't mean that you should own each individual risk. The best way to secure ownership for the risks is to collaboratively agree who owns what. Determining risk responsibilities in a workshop is much better than having the project manager assign ownership on their own and hoping that people will accept it.
Step 6: Monitor and communicate risks
The final step is to continually monitor and communicate the risks you have identified along with the agreed-upon actions. Schedule regular risk reviews with your team and stakeholders to identify new or changed risks that need to be addressed. Remember to always mention your main risks and mitigating actions in your progress reports and to highlight them during steering committee meetings. Not only will this show your stakeholders that you're on top of things, you might also get valuable feedback that will help you to mitigate risks even better.
The above risk management process is great for risks that you can foresee, but what can you do about unknown risks that your team is not aware of? One way of getting around this is to involve people in the risk identification process from outside the project. People who think in unconventional ways and have a different viewpoint may be able to spot the unknowns that we cannot spot ourselves. Some risks however cannot be spotted either by the team or by outsiders as they are inherently unknown. All we can do in those cases is to build contingency and flexibility into the plan so that we can cope with the impact of the unexpected, wherever it comes from.
To read more about how collaborate planning and project leadership, pick up a copy of “The Power of Project Leadership”.
Conclusion
Risk management is imperative to effective project delivery, as it is much easier to manage risks than waiting until they become issues. One of the cornerstones in managing risks is to be collaborative in your approach by brainstorming potential risks with key team members and stakeholders. It helps you identify and deal with potential threats and creates a shared sense of responsibility. You should also involve people from outside the project to help you spot the unknown risks.
After you have identified your risks, explore the root cause and determine how to best mitigate the risks that have the highest impact and probability. Resist the temptation to assign yourself to too many risks. Instead, jointly determine who the most appropriate owner of each risk is.
Encourage a discussion around the project’s main risks at the monthly steering committee meeting and remember to always communicate an important risk to senior stakeholders in person before they see it in writing.
If you liked this post, you may also like:
7 steps to building a collaborative plan
Top Tips for Providing Effective Feedback
6 Principles for building trusting Stakeholder relationships
How to create a strong team identity during kick-off


 RSS Feed