Whenever I train, coach or consult in project management, it always surprises me how few people plan in a truly collaborative manner. I’ve trained senior project professionals with fifteen to twenty years of experience who don’t appreciate the importance of fully engaging the team in the planning process. They see it as the project manager’s responsibility to plan, and forget that today’s workforce wants to be involved in the work it’s expected to deliver. Many project managers only involve the team as and when needed. But that approach is extremely poor at creating a team that’s committed and united around a common goal. Instead, it creates a group of individuals who work in silos and are focused on completing their own individual tasks.
Below, I have outlined a seven-step approach that will help you create a collaborative plan. It involves the use of sticky notes and whiteboards and can be applied whether your team is physically located in the same room or online. Nothing beats face-to-face interaction, but online planning has become easier than ever before with the arrival of cloud-based collaboration tools – Miro being one of them.
Step 0 – Review project scope
Let’s assume that the project has already been kicked off and defined by the time the planning exercise starts. A well-defined project is one where the team has a common understanding of what it’s meant to deliver and by when. Step zero of the collaborative planning process is therefore to remind the team of what the project’s scope and end deliverables are.
Step 1 – Silently brainstorm tasks
The collaborative planning process starts in earnest at the first step. This is where the team brainstorms everything that needs to get done within the boundaries of the project. To do the brainstorming well, make use of post-it-notes and ask people to write down all the tasks and activities that are in scope of the project. They should capture one item per post-it note. It’s important not to criticize or restrict people at this stage. Just let them write down whatever comes to mind, as this is the best way to create engagement.
After years of having facilitated this planning process I’ve learnt that a silent brainstorm tends to works better than the traditional brainstorm, where people shout out loud. With the traditional brainstorming the most extroverted team members will dominate the conversation, cutting off more quiet individuals. The silent brainstorm is a great way to get everyone to contribute equally. It basically means that each team member brainstorms individually for a few minutes.
Step 2 – Consolidate and remove duplicates
After the team members have brainstormed on their own, they may have accumulated up to 25 post-it notes that overlap with those captured by other team members. The second step is therefore to remove duplicates. Read out the brainstormed tasks, remove duplicates and let team members come to an agreement about which tasks and activities they believe the project consists of.
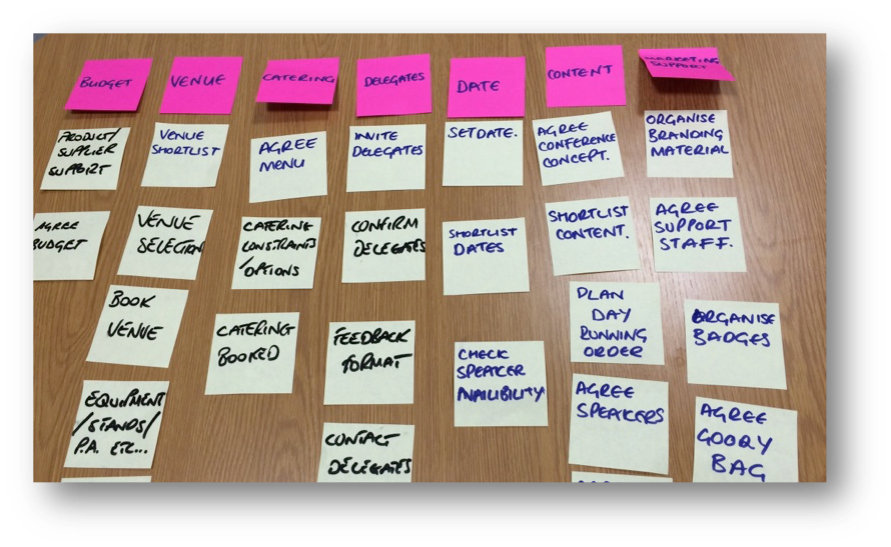
Step 3 – Categorise tasks into logical groups
The team now has a manageable number of sticky notes that can be grouped into categories or work-streams of the project. One work stream may be related to communication, another to finance, a third to technology etc. At the end of this step, the team will have identified between five and ten categories and will have a number of tasks allocated to each category. It is best to use a whiteboard, flipchart or a wall for this activity where everyone can see which sticky notes belong to which category. The categories can be identified and captured on different-colour post-its so that they are easily distinguished from the tasks. It is important to keep using sticky notes as it makes the process much more dynamic and changeable. Don’t begin to write the category names straight on the whiteboard.
Step 0 – Review project scope
Let’s assume that the project has already been kicked off and defined by the time the planning exercise starts. A well-defined project is one where the team has a common understanding of what it’s meant to deliver and by when. Step zero of the collaborative planning process is therefore to remind the team of what the project’s scope and end deliverables are.
Step 1 – Silently brainstorm tasks
The collaborative planning process starts in earnest at the first step. This is where the team brainstorms everything that needs to get done within the boundaries of the project. To do the brainstorming well, make use of post-it-notes and ask people to write down all the tasks and activities that are in scope of the project. They should capture one item per post-it note. It’s important not to criticize or restrict people at this stage. Just let them write down whatever comes to mind, as this is the best way to create engagement.
After years of having facilitated this planning process I’ve learnt that a silent brainstorm tends to works better than the traditional brainstorm, where people shout out loud. With the traditional brainstorming the most extroverted team members will dominate the conversation, cutting off more quiet individuals. The silent brainstorm is a great way to get everyone to contribute equally. It basically means that each team member brainstorms individually for a few minutes.
Step 2 – Consolidate and remove duplicates
After the team members have brainstormed on their own, they may have accumulated up to 25 post-it notes that overlap with those captured by other team members. The second step is therefore to remove duplicates. Read out the brainstormed tasks, remove duplicates and let team members come to an agreement about which tasks and activities they believe the project consists of.
Step 3 – Categorise tasks into logical groups
The team now has a manageable number of sticky notes that can be grouped into categories or work-streams of the project. One work stream may be related to communication, another to finance, a third to technology etc. At the end of this step, the team will have identified between five and ten categories and will have a number of tasks allocated to each category. It is best to use a whiteboard, flipchart or a wall for this activity where everyone can see which sticky notes belong to which category. The categories can be identified and captured on different-colour post-its so that they are easily distinguished from the tasks. It is important to keep using sticky notes as it makes the process much more dynamic and changeable. Don’t begin to write the category names straight on the whiteboard.
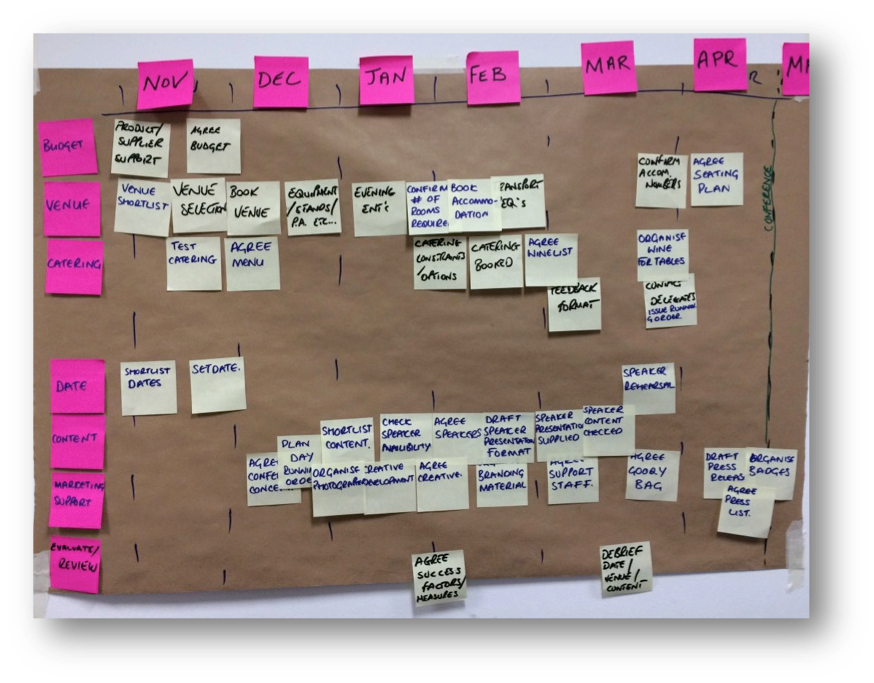
Step 4 – Create the timeline
The fourth step is to prepare the schedule for the high-level plan. Start by putting a timeline across the top of your whiteboard or flipchart paper, flowing from left to right. Use more sticky notes to illustrate the different months of the plan. Then place the categories, or work stream headers, down the left-hand side of your chart. You can now create a grid consisting of horizontal and vertical “swim lanes”. The grid will make it easier to place tasks onto the schedule within the correct month and work stream.
Step 5 – Place tasks onto the schedule
The next step is to transfer the individual tasks onto the schedule based on dependencies. Start by placing the sticky note containing the end deliverable onto the right-hand side of the chart. Then transfer all the tasks, one by one. Tasks that can be completed relatively early are placed towards the left and items that can be completed later are on the right. This is a very dynamic process where team members discuss where, ideally, this task needs to happen on the timeline. As they place the sticky notes, they should take into account dependencies, as some tasks naturally need to happen before others. Dependencies can be indicated with a marker pen between post-its.
At the end of this step you will have produced a high-level plan showing when each task and activity can be completed in relation to one another. At this stage, when you don’t yet have all the detailed information, it’s ok to make assumptions and to use approximate durations. The collaborative planning process is a springboard to more in-depth planning conversations later on.
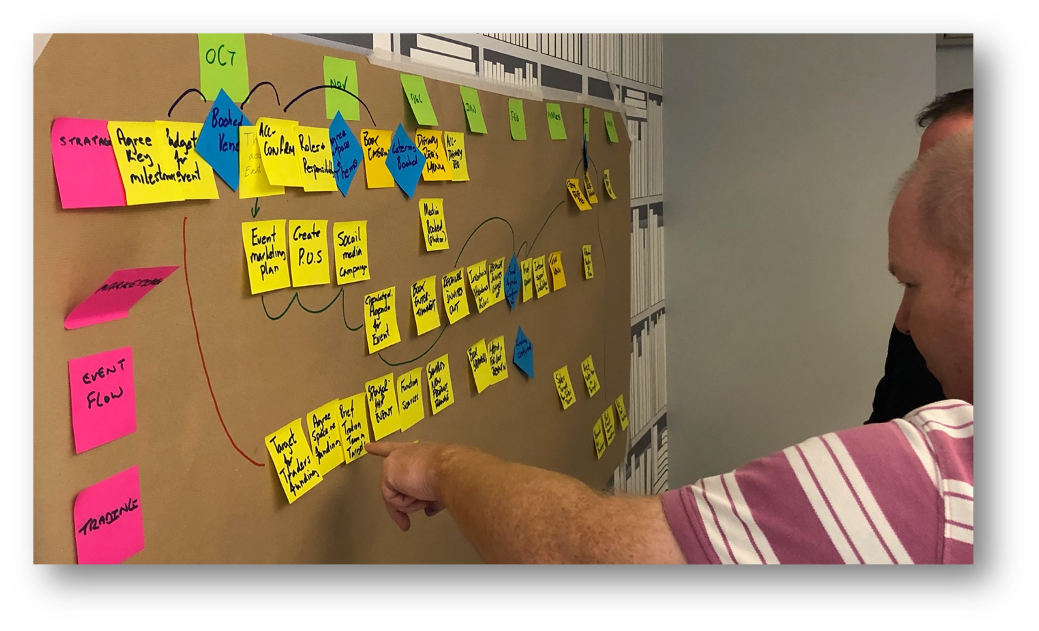
Step 6 – Identify milestones
Now that the high-level plan is in place it is time to identify the milestones. Choose a new colour sticky notes and identify six to twelve milestones. Milestones are tasks with zero duration that indicate an important achievement in the project. They are used to indicate movement and progress and are useful for stakeholder communication and for reporting upwards.
Step 7 - Assign owners
The last step of the collaborative planning process is to assign ownership to each task and milestone on the chart. Each sticky note should have one owner who is accountable for moving the task forward. The owner may or may not be the person actually doing the work. Irrespective, it is the person who is accountable for it.
The end result of the collaborative planning process is a high-level plan, with dependencies, milestones and ownership, built by the team. Each person now needs go to away and validate that the tasks they are accountable for can actually happen at the indicated dates. The beauty of this approach is that because the plan has been built collaboratively, team members are much more likely to commit to it. The plan will also help you to communicate clearly with stakeholders, as a one-page milestone plan may be all that they need.
If you liked this post, you may also like:
Team Motivation: Why we need more than money to be truly fulfilled
Risk management is how adults manage projects
Overcoming resistance to change
Delegate effectively and thoughtfully
What makes a high performing project team?


 RSS Feed